Nowadays, it is (rightfully) impossible to put an embedded device into the market without comprehensive embedded device security measures. Most new devices store private data that we do not want to see leaked in dark corners of the Internet. We also want to avoid our device ending up as part of a botnet.
Linux has a large set of tools to help us with security. What has historically been lacking is a simple, off-the-shelf way to integrate these tools into a secure-by-default configuration. This post will demonstrate how modern tools simplify deployments while ensuring strong security.
Embedded Device Security Scope
When talking about embedded system security, we should of course also talk about what we are actually trying to protect again. It is impossible to generalize a threat model over all possible embedded devices, but we can try to collect some typical requirements.
Usually, we will find two variants of data on a system:
- Fixed binaries and libraries forming the operating system
- And variable configuration and user-data that is changed at the runtime
For the operating system we need to ensure the integrity of the factory image. This guards against supply chain attacks and the booting of non-authorized software. However, for the purposes of this blog, we won’t consider the operating system binaries as confidential.
We do consider the dynamic configuration and user data to be confidential. This data is only generated during the runtime of the device and is not flashed at the factory or replaced during updates. This data we definitively want to protect against being read out on stolen devices.
There are way more options and scenarios that might be relevant to your specific device. But this gives us a good basis to build on!
Filesystem configuration
Sounds like a plan? Let’s move to execution…
Linux allows very flexible filesystem configurations. For a typical embedded device it usually boils down to some places in `/etc`, `/var` and `/home` being required to be writable while the rest can remain an immutable image.
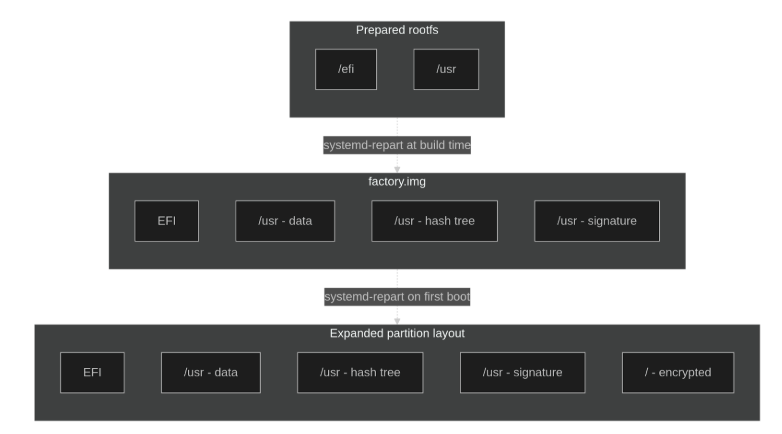
We can implement the root file system (`/`) as immutable and mount in the various writable locations. However, managing multiple exceptions from the norm is cumbersome. Instead, there is a much easier alternative: make `/` writable and mount a readonly `/usr` partition. `/usr` is where all the system files are stored. They are all immutable and any other files can be automatically populated on the first boot. This allows us to drop the `/` partition from the factory image and only ship the `/usr` part.
This might seem like a slightly counter intuitive approach at first. But it makes managing the writable partition a lot easier. Having to only manage two partitions without any symlinks between them is the most obvious benefit. It also makes the cut between the different requirements for the two partitions easier. One will require integrity checks and the other partition will require encryption.
Key management also becomes easier (and more secure) if we can create the keys on the device on first boot. Incorporating per-device encryption into a deployment that happens from a single factory image is a lot simpler if we create the encrypted partitions on the device. Otherwise we will find ourselves having to do some awkward in-place re-encryption of these partitions. Another thing that also becomes easier with partitions created at first-boot is a factory reset mechanism. We can simply toss out the encrypted partitions, delete the keys and start fresh by recreating them.
Now, the critical reader may be wondering how we survive the first boot attempt without having a `/` filesystem. Linux really needs it for switching to user-space eventually. Thus, we need to find a replacement. An initrd filesystem will come to rescue—a minimal filesystem. Don’t worry, setting that one up will be a lot easier than one might assume.
Securing Embedded Device Operating System
Dealing with an immutable filesystem makes integrity checks fairly easy. We can simply guard the entire partition block by putting it into a dm-verity partition. This builds a hash tree over the blocks of the filesystem leading to eventually a single root-hash that can be used to verify the integrity of the entire hash tree and thus also the filesystem.
Now, we still need to somehow sign that root-hash to ensure it originates from our trusted build process. This is typically the part where the complexity starts to creep in. One option is to bake the hash into the kernel commandline by appending `usrhash=<root-hash>`, which then will be signed together with the other boot artifacts. This seems straightforward, but complicates the build process as we now need to build the `/usr` partition before injecting the `usrhash` into the kernel commandline–or more likely: into a Unified Kernel Image (UKI). This leads to our `/boot` partition depending on the build of `/usr` or requires some patching of the built image to inject the `usrhash=` option.
The alternative is to have some metadata elsewhere that contains the hash and a signature over it. People have come up with various ways to do this. But lately, a group of systemd and Linux distribution maintainers has been formed to define standards for this. The uapi-group now provides a standard for securely auto-discovering the root-hash and its signature. Even better: We do not have to bother with the whole dm-verity setup at all. `systemd-repart` has support for it and will automate the whole thing for us. Systemd also comes with its counterpart `systemd-gpt-auto-generator` that does the discovery and mounting for us.
Side topic: systemd-repart
`systemd-repart` at its core does exactly what the name suggests: It allows repartitioning of a disk based on some simple configuration files.
Given the following configuration:
# 00-esp.conf
[Partition]
Type=esp
# 20-root.conf
[Partition]
Type=root
Weight=1000
# 30-home.conf
[Partition]
Type=home
Format=btrfs
SizeMinBytes=1G
Weight=2000
It will compare which partitions exist on the booted disk to the configuration and create the missing ones. The configuration format is simple, yet powerful.
But this is not even the best feature of `systemd-repart`. It can also create disk images from scratch!
An example:
# 00-esp.conf
[Partition]
Type=esp
Format=vfat
CopyFiles=/boot:/
CopyFiles=/efi:/
SizeMinBytes=512M
SizeMaxBytes=512M
# mkosi.repart/10-usr.conf
[Partition]
Type=usr
CopyFiles=/usr:/
Verity=data
VerityMatchKey=usr
Minimize=guess
# mkosi.repart/20-usr-verity.conf
[Partition]
Type=usr-verity
Verity=hash
VerityMatchKey=usr
Minimize=best
# mkosi.repart/30-usr-verity-sig.conf
[Partition]
Type=usr-verity-sig
Verity=signature
VerityMatchKey=usr
Minimize=best
With this config, we can call:
systemd-repart \
–root=”/path/to/our/prepared/root/filesystem” \
–empty=create –size=auto –offline=yes \
–private-key=<db.key> \
–certificate=<db.crt> \
It will handle all the dm-verity setup, signing and assign the well-known GPT partition UUIDs that `systemd-gpt-auto-generator` can detect to auto-mount.

With this, we will get our `/usr` burned into the factory image and then use `systemd-repart` again on the device to fill in the remaining parts.
Protecting Writable Data in Embedded Device Security
With the static part out of the way, let’s look at the dynamic `/` partition. We want to protect against this being dumped on stolen devices. So we will need some kind of encryption.
Asking a user for a pincode is an easy way to solve this. But this becomes impractical for headless appliances. Instead we will need some kind of secure mechanism to only release some key material when the system is in a well-defined state. Various chip vendors have provided such mechanisms for a while. But securely implementing those mechanisms is challenging and often requires getting an NDA to even peek at the relevant reference manual.
Luckily, again we have a standard to reach for: Trusted Platform Modules (TPMs). What sounds like a specific hardware solution is actually more an API than actual hardware. TPMs can also be implemented in firmware solutions that are running in isolated environments on the main CPU. On embedded devices where we can have great control over the kind of firmware that we run, firmware TPMs can be a great way to get a standard compliant TPM solution without needing any actual TPM hardware.
Covering the TPM 2.0 standard in detail is beyond the scope of this blog post. What matters is that the standard gives us a mechanism to bind keys to specific system states. These keys are then only accessible in those specific states. TPM and UEFI work well together and there are registers reserved for various states of the firmware to measure into. uapi-group defines a list of registers and their allocation that are relevant for a typical Linux system.
For the scope of this post we will only look at the register named “PCR #7”. This register accumulates all the state that impacts the secure boot state. It allows us to bind to the keys and signatures that were used to confirm the various boot components, effectively giving us a way to only reveal a key when the earlier chain was verified successfully. This guards the encryption keys as long as nothing can read the TPM after secure boot. With firmware TPMs that means that our keys are safe if our secure boot mechanism is safe.
How to set all of this up? Easy: Use `systemd-repart`!
[Partition]
Type=root
Encrypt=tpm2
`systemd-repart` will automatically create an encrypted partition, enroll it with the TPM and create a filesystem within. The filesystem will have the right partition UUID set so that it can be automatically detected by a systemd-based initrd.
Putting it together
Let’s put it all together. We will use mkosi to build our factory image. It integrates well with systemd tooling and saves us from building everything from scratch.
We will use a simple config to build a custom image based on Fedora packages:
[Distribution]
Distribution=fedora
Architecture=arm64
[Content]
Packages=systemd-boot,kernel-core
InitrdPackages=systemd-repart
Bootable=yes
KernelCommandLine=
# Only allow verity+signed /usr and encrypted auto-mounts
systemd.image_policy=usr=verity+signed:root=encrypted
# disable emergency shells
rd.systemd.mask=emergency.service systemd.mask=emergency.service
rd.systemd.mask=rescue.service systemd.mask=rescue.service
# INSECURE: Enable password less root for testing 🙂
RootPassword=hashed:
Autologin=yes
[Validation]
SecureBoot=yes
Verity=yes
VerityKey=mkosi.key
VerityCertificate=mkosi.crt
[Runtime]
RuntimeSize=2G
Then we can drop our partition config into `mkosi.repart/` (this will define the factory image partition layout). The one I showed in the earlier section will do fine.
Finally, we can drop the runtime partition config into `mkosi.extra` (which will be added into the image):
==> mkosi.extra/usr/lib/repart.d/00-esp.conf <==
[Partition]
Type=esp
==> mkosi.extra/usr/lib/repart.d/10-usr.conf <==
[Partition]
Type=usr
==> mkosi.extra/usr/lib/repart.d/20-usr-verity.conf <==
[Partition]
Type=usr-verity
==> mkosi.extra/usr/lib/repart.d/30-usr-verity.conf <==
[Partition]
Type=usr-verity-sig
==> mkosi.extra/usr/lib/repart.d/40-root.conf <==
[Partition]
Type=root
Encrypt=tpm2
We can build and boot the system with `mkosi build && mkosi vm`
I provide the example config in a repo: https://github.com/riscstar/blogpost-secure-boot-userspace
Summary

This blog shows that security on embedded Linux systems does not need to be hard. We live in a world where we can simply pick components off the shelf and achieve better security than 90% of existing embedded deployments.
Of course, embedded device security always requires an analysis specific to the needs of the specific system. This post provides a good basis for creating a secure, encrypted root filesystem. It does that while keeping complexity low. But when giving security advice one also has to present the caveats. This blog does not cover everything for secure embedded system design. I do not cover more advanced ways to narrow the key reveal to just the initrd. This can help to further limit the attack surface. You will also need rollback protection to prevent an attacker from booting an older, signed kernel with known security defects. Such a kernel can otherwise be exploited to access your confidential data.
Finally, I only demo a simple `mkosi` image here. It is not difficult to apply the same mechanisms to Yocto-built images as well. Stay safe and make sure your systems do as well!
Need help implementing embedded device security? Our engineers specialize in securing Arm and RISC-V embedded systems
This was a guest post on CNX Software


